Draw Circle Game Dev 1 Cos

Larn Trigonometry for game programming!
This is a post by iOS Tutorial Team member Matthijs Hollemans, an experienced iOS programmer and designer. You lot can find him on Google+ and Twitter.
Does the thought of doing mathematics give you cold sweats? Are y'all gear up to requite up on your career as a budding game developer because the math merely doesn't make any sense to you?
Don't fret – math tin be fun, and this cool 2-function game tutorial will back up that claim!
Here'south a lilliputian secret: as an app programmer, you don't really need to know a lot of math. If you tin add or multiply two numbers together, you're already halfway there. Most of the computations that we practise in our professional person lives don't get much across basic arithmetic.
That said, for making games it is useful to have a few more than math skills in your toolbox. You don't need to become as smart every bit Archimedes or Einstein, but a basic understanding of trigonometry, combined with some mutual sense, volition take you a long way.
In this tutorial, you will learn most some of import trigonometric functions and how y'all tin use them in your games. Then you'll get some practice applying the theories by developing a unproblematic spaces shooter iPhone game that requires a lot of trigonometry, using the Cocos2D game framework.
Don't worry if you've never used Cocos2D before or are going to use a unlike framework for your game – the mathematics nosotros'll embrace in this tutorial will utilise to your engine no thing what. And y'all don't demand any prior experience, equally I'll walk through the procedure step-by-step.
If you supply the common sense, this tutorial will get you upwards to speed on the trig, and so allow'south get started!
Getting Started: It's All Nearly Triangles
Information technology sounds like a mouthful, just trigonometry simply means calculations with triangles (that's where the tri comes from).
You may not have realized it until now, but games are full of triangles. For example, imagine you have a spaceship game, and you lot desire to summate the distance between these ships:
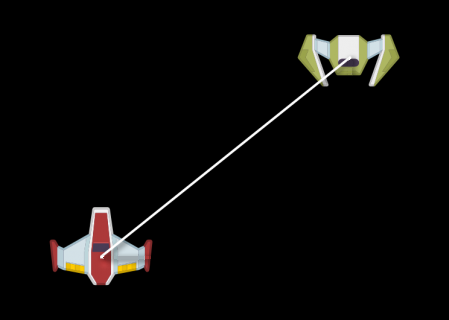
Yous accept X and Y position of each send, but how can you find the length of that line?
Well, you can simply draw a line from the center signal of each ship to form a triangle like this:

Then, since you know the 10 and Y coordinates of each ship, you can compute the length of each of the new lines. Now that you lot know the lengths of two sides of the triangle, y'all can employ some Trigonometry to compute the length of the diagonal line – the altitude between the ships.
Note that one of the corners of this triangle has an angle of 90 degrees. This is as well known equally a right triangle, and that'due south the sort of triangle y'all'll be dealing with in this tutorial.
Any time you tin can express something in your game as a triangle with a 90-caste right angle – such as the spatial relationship between the two sprites in the moving-picture show – you tin can use trigonometric functions to practise calculations on them.
And then in summary, Trigonometry is the mathematics that you use to calculate the lengths of the sides of these triangles, too as the angles between those sides. And that comes in handy more oft that you might think.
For example, in this space transport game you might want to:
- Have one ship shoot a light amplification by stimulated emission of radiation in the direction of the other ship
- Have 1 ship showtime moving in the management of another ship to chase
- Play a warning sound effect if an enemy ship is getting too shut
All of this and more you tin can do with the power of Trigonometry!
Your Arsenal of Functions
First, let's get the theory out of the way. Don't worry, I'll keep information technology short and so you can become to the fun coding bits equally quickly as possible.
These are the parts that make up a right triangle:

In the picture in a higher place, the slanted side is chosen the hypotenuse. It always sits beyond from the corner with the 90-degree angle (as well called a right angle), and it is ever the longest of the three sides.
The two remaining sides are called the adjacent and the opposite, as seen from one particular corner of the triangle, the bottom-left corner in this case.
If you lot expect at the triangle from the other corner (superlative-right), and then the adjacent and contrary modify places:

Alpha (α) and beta (β) are the names of the two other angles. Yous tin can call these angles annihilation yous want (as long every bit it sounds Greek!) but usually blastoff is the bending in the corner of interest and beta is the angle in the opposing corner. In other words, you label your opposite and next sides with respect to blastoff.
The absurd matter is that if yous only know two of these things, trig allows you to find out all the others using the sine, cosine and tangent functions. For instance, if you know an bending and the length of one of the sides, and then the sine, cosine and tangent functions can tell you the length of the other sides:

Call up of the sin, cos, and tan functions as "black boxes" – y'all plug in numbers and go back results. They are pre-written functions you can telephone call from about whatever programming language.
Know Angle and Length, Need Sides
Permit'south consider an instance. Say you know the blastoff angle between the ships is 45 degrees, and the length betwixt the ships (the hypotenuse) is 10 points long. You can and so plug these values into the formula:
sin(45) = contrary / x
To solve this for the hypotenuse, yous shift things around a bit:
opposite = sin(45) * 10
If y'all call the built-in sin part, yous'll notice the sine of 45 degrees is 0.707 (rounded off), and filling that in that gives you lot the result:
opposite = 0.707 * ten = vii.07
At that place is a handy mnemonic for remembering what these functions practice that you may remember from loftier school: SOH-CAH-TOA (where SOH stands for Sine is Contrary over Hypotenuse, then on), or if you lot demand something more than catchy: Some One-time Hippy / Caught Some other Hippy / Tripping On Acid. (That hippy was probably a mathematician who did a petty too much trig.) :]
Know 2 Sides, Demand Angle
The above formulas are useful when you already know an angle, but that is not e'er the case – sometimes it is the angle yous are looking for. And then you need to know the lengths of at least two of the sides and plug these into the inverse functions:
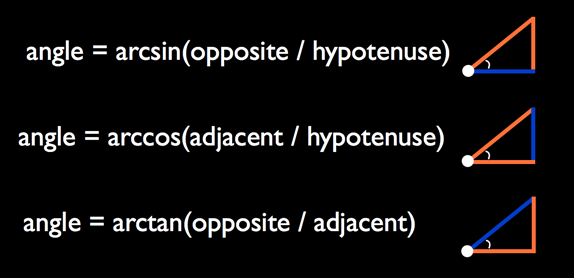
- bending = arcsin(opposite/hypotenuse)
- bending = arccos(adjacent/hypotenuse)
- bending = arctan(opposite/next)
In other words, if sin(a) = b, so it is too true that arcsin(b) = a. Of these inverse functions, you lot will use the arc tangent (arctan) the most in practice. Sometimes these functions are also notated as sin-i, cos-1, and tan-1, so don't allow that fool you.
Is any of this sinking in or sounding familiar? Proficient, but you're non done withal with the theory lesson – in that location is still more that you lot can calculate with triangles.
Know 2 Sides, Demand Remaining Side
Sometimes you may know the length of ii of the sides and need to know the length of the 3rd, similar in the instance at the beginning of this tutorial where y'all wanted to detect the distance between the two space ships.
This is where Trigonometry's Pythagorean Theorem comes to the rescue. Even if yous forgot everything else nigh math, this is probably the one formula yous do remember:
a2 + b2 = cii
Or, put in terms of the triangle that you saw earlier:
opposite2 + next2 = hypotenuse2
If you know any two of these sides, then calculating the 3rd is but a thing of filling in the formula and taking the square root. This is a very common thing to do in games and you'll be seeing information technology several times in this tutorial.
Note: Want to drill this formula into your caput while having a great express mirth at the same fourth dimension? Search YouTube for "Pythagoras song" – it'due south an inspiration for many!
Accept Angle, Need Other Angle
Lastly, the angles. If y'all know one of the non-right angles from the triangle, then figuring out the other ones is a piece of cake. In a triangle, all angles always add up to a total of 180 degrees. Considering this is a right triangle, you already know that ane of the angles is 90 degrees. That leaves:
alpha + beta + 90 = 180
Or simply:
alpha + beta = xc
The remaining 2 angles must add up to xc degrees. So if you know alpha, you also know beta, and vice-versa.
And those are all the formulas y'all need to know! Which ane to employ in do depends on the pieces that you already have. Normally you lot either have the angle and the length of at least i of the sides, or y'all don't have the bending merely you do accept two of the sides.
Plenty theory. Let'southward put this stuff into practise.

To Skip, or Not to Skip?
In the adjacent few sections, you will be setting up a basic Cocos2D project with a space ship that can movement effectually the screen using the accelerometer. This won't involve any trigonometry (even so), then if you already know Cocos2D and feel similar this guy:

So feel free to skip alee to the Brainstorm the Trigonometry! department below – I have a starter project waiting for you there.
Only if you're the blazon who likes to code everything from scratch, keep reading! :]
Getting Started
To get started, download the latest version of the Cocos2D v2.i branch. At the time of writing, this is the "unstable" version cocos2d-iphone-2.1-rc1.
After Cocos2D is done downloading and unzipping, you lot want to install the projection templates. Open a Concluding window to the directory where you downloaded Cocos2D and enter the following command:
./install-templates.sh -f You lot should see "Installing cocos2d templates" and a bunch of messages. Now you lot're ready to piece of work with Cocos2D.
Fire up Xcode and create a new application from the "cocos2d iOS" template yous just installed.

Name the projection TrigBlaster and set the device family to iPhone. Build and run the template as-is. If all works OK, you should run into the following:

You are going to employ ARC in this projection, just Cocos2D projects have it disabled by default. Luckily, enabling ARC is actually easy. Merely go to Edit\Refactor\Convert to Objective-C ARC. Expand the driblet-downwardly and select only the last four files (main.k, AppDelegate.grand, HelloWorldLayer.1000, and IntroLayer.m), and so click Check and finish the steps in the wizard.

Notation: When you convert a projection to ARC or make other big changes, Xcode will prompt yous to enable snapshots for the current project. A snapshot saves the state of the unabridged project as if you copied and pasted the projection into some other directory. Y'all tin acquire more than about snapshots over here. For the purposes of this tutorial, select disable.
Next download the resources for this tutorial. This file contains the images for the sprites and the sound effects. Unzip it and drag the Images and Sounds folders into Xcode to add them to the project. In the import dialog, brand sure Copy items into destination group's folder is checked.

Great, the preliminaries are over and done with – at present let's get coding for existent.
Steering with Accelerometers
Because this is a simple game, yous will be doing all your piece of work within a unmarried class: the HelloWorldLayer. Right at present, this layer contains a bunch of stuff that you don't demand.
Supplant the contents of HelloWorldLayer.h with:
#import "cocos2d.h" @interface HelloWorldLayer : CCLayerColor + (CCScene *)scene; @finish This game doesn't use GameKit, then yous got rid of that. You also changed HelloWorldLayer from a patently CCLayer to a CCLayerColor so that you tin can have a background color other than just black.
There is as well a bunch of code in the .m file that y'all don't need for this game. Replace HelloWorldLayer.m with:
#import "HelloWorldLayer.h" #import "SimpleAudioEngine.h" @implementation HelloWorldLayer + (CCScene *)scene { CCScene *scene = [CCScene node]; HelloWorldLayer *layer = [HelloWorldLayer node]; [scene addChild:layer]; render scene; } - (id)init { if ((self = [super initWithColor:ccc4(94, 63, 107, 255)])) { } render self; } @end The scene method is unchanged from the template, simply init at present calls [super initWithColor] to ready a majestic background color on the layer.
Build and run, and you should see nothing but royal:

Let's brand things a flake more exciting by adding a spaceship to the scene. Yous volition need some instance variables for this, and then alter the @implementation line in HelloWorldLayer.grand as follows:
@implementation HelloWorldLayer { CGSize _winSize; CCSprite *_playerSprite; } The _winSize variable stores the dimensions of the screen, which is useful because you will be referring to that quite oftentimes. The _playerSprite variable holds the spaceship sprite.
At present change init to the following:
- (id)init { if ((cocky = [super initWithColor:ccc4(94, 63, 107, 255)])) { _winSize = [CCDirector sharedDirector].winSize; _playerSprite = [CCSprite spriteWithFile:@"Player.png"]; _playerSprite.position = ccp(_winSize.width - 50.0f, 50.0f); [cocky addChild:_playerSprite]; } return self; } This is all pretty bones if you take worked with Cocos2D before. The player sprite is positioned in the bottom-right corner of the screen. Recollect that with Cocos2D, information technology is the bottom of the screen that has y-coordinate 0, different in UIKit, where y = 0 points to the top of the screen.
Build and run to try it out, and yous should encounter the post-obit:

To move the spaceship, this game uses the iPhone's built-in accelerometers. Unfortunately, the iOS Simulator cannot simulate the accelerometers. That means that from now on, you lot volition need to run the app on your device to examination information technology.
Note: If you are unsure how to put the app on your device, bank check out this extensive tutorial that explains how to obtain and install the certificates and provisioning profiles that allow Xcode to run apps on your device. It's not as intimidating as it looks, but you practice need to sign up for the paid Apple programmer program.
To motility the spaceship with the accelerometers, you lot'll patently exist rocking your device from side to side. During testing I plant that this sometimes caused the screen to autorotate from landscape right to landscape left, which is really abrasive when you're in the middle of a heated boxing.
To prevent that from happening, go into the Target Settings screen and in the Summary tab under Supported Interface Orientations, de-select all options except for Landscape Correct.

Using the accelerometers from code is pretty straightforward. You lot first enquire Cocos2D to activate the accelerometers. One time enabled, it sends you lot periodic updates with the values of the three accelerometers that are built into the iPhone. You then use these values to change the speed of the spaceship.
Showtime, add new instance variables to keep track of the accelerometer values. You lot simply store the values for two of the accelerometers; the "Z" one isn't used by this game.
@implementation HelloWorldLayer { . . . UIAccelerationValue _accelerometerX; UIAccelerationValue _accelerometerY; } A good place to actuate the accelerometers is inside init. Add the following line to it:
self.accelerometerEnabled = YES; Finally, add the method that receives the accelerometer values:
- (void)accelerometer:(UIAccelerometer *)accelerometer didAccelerate:(UIAcceleration *)acceleration { const double FilteringFactor = 0.75; _accelerometerX = acceleration.x * FilteringFactor + _accelerometerX * (1.0 - FilteringFactor); _accelerometerY = acceleration.y * FilteringFactor + _accelerometerY * (i.0 - FilteringFactor); } This scrap of logic is necessary to filter – or "smoothen" – the data that you get back from the accelerometers and so that it appears less jittery.
Annotation: An accelerometer records how much gravity currently pulls on information technology. Because the user is property the iPhone in her easily, and hands are never completely steady, there are a lot of tiny fluctuations in this gravity value. Nosotros are not and then much interested in these unsteady motions as in the larger changes in orientation that the user makes to the device. By applying this simple low-laissez passer filter, you retain this orientation information but filter out the less important fluctuations.
At present that yous accept a stable measurement of the device's orientation, how tin you use this to make the actor'due south spaceship move?
Motion in games often works like this:
- Set the acceleration based on some form of user input, in this instance from the accelerometer values.
- Add the new dispatch to the spaceship'southward electric current speed. This makes the object speed upward or slow down, depending on the direction of the acceleration.
- Add the new speed to the spaceship'southward position to make it motility.
Of course, you have a great mathematician to give thanks for these equations: Sir Isaac Newton!

You need some more instance variables to pull this off. In that location is no need to keep track of the player'due south position because the CCSprite already does that for you, but acceleration and speed are your own responsibility.
Add these instance variables:
@implementation HelloWorldLayer { . . . bladder _playerAccelX; bladder _playerAccelY; float _playerSpeedX; float _playerSpeedY; } It's good to set some bounds on how fast the spaceship can travel or it would be pretty hard to maneuver. Space dispatch sounds like a skillful idea in theory only in practise it doesn't work out so well (besides, even Einstein thinks in that location are limits to how fast you tin can go).
Add the following lines direct beneath the #import argument:
const bladder MaxPlayerAccel = 400.0f; const float MaxPlayerSpeed = 200.0f; This defines ii constants, the maximum acceleration (400 points per 2nd squared) and the maximum speed (200 points per 2nd).
Now add the following bit of logic to the lesser of accelerometer:didAccelerate::
if (_accelerometerY > 0.05) { _playerAccelX = -MaxPlayerAccel; } else if (_accelerometerY < -0.05) { _playerAccelX = MaxPlayerAccel; } if (_accelerometerX < -0.05) { _playerAccelY = -MaxPlayerAccel; } else if (_accelerometerX > 0.05) { _playerAccelY = MaxPlayerAccel; } This is a basic technique for decision-making a sprite using the accelerometers. When the device is tilted to the left, you give the player maximum acceleration to the left. Conversely, when the device is tilted to the right, yous give the thespian maximum dispatch to the correct. Too for the up and down directions.
Notation: You lot're using the _accelerometerY value for the x-direction. That'south as it should be. Recollect that this game is in landscape, and so the Y-accelerometer runs from left to right in this orientation, and the 10-accelerometer from elevation to lesser.
You're virtually at that place. The last step is applying the _playerAccelX and Y values to the speed and position of the spaceship. You will do this in the game's update method. This method is called 60 times per 2nd, so it's the natural place to perform all of the game logic.
Add together updatePlayer to the course:
- (void)updatePlayer:(ccTime)dt { // one _playerSpeedX += _playerAccelX * dt; _playerSpeedY += _playerAccelY * dt; // two _playerSpeedX = fmaxf(fminf(_playerSpeedX, MaxPlayerSpeed), -MaxPlayerSpeed); _playerSpeedY = fmaxf(fminf(_playerSpeedY, MaxPlayerSpeed), -MaxPlayerSpeed); // 3 float newX = _playerSprite.position.x + _playerSpeedX*dt; float newY = _playerSprite.position.y + _playerSpeedY*dt; // 4 newX = MIN(_winSize.width, MAX(newX, 0)); newY = MIN(_winSize.superlative, MAX(newY, 0)); _playerSprite.position = ccp(newX, newY); } If you've programmed games before (or studied physics), then this should look very familiar. Here's how it works:
-
Add the current dispatch to the speed.
The dispatch is expressed in points per second (actually, per second squared, but don't worry about that) but
update:is performed a lot more often than in one case per second. To compensate for this divergence, you multiply the dispatch by the elapsed or "delta" time,dt. Without this, the spaceship would motility about sixty times faster than it should! -
Clamp the speed and then that information technology doesn't go faster than
MaxPlayerSpeedif it is positive or-MaxPlayerSpeedif it is negative. You could write this using anifstatement instead:if (_playerSpeedX < -MaxPlayerSpeed) { _playerSpeedX = -MaxPlayerSpeed; } else if (_playerSpeedX > MaxPlayerSpeed) { _playerSpeedX = MaxPlayerSpeed; }However, I similar the succinctness of the i-line version.
fminf()makes certain the speed doesn't get larger thanMaxPlayerSpeedconsidering it always picks the smallest of the two, whilefmaxf()makes sure the speed doesn't drib below-MaxPlayerSpeedbecause information technology always picks the largest value. It's a groovy piddling trick. - Add the current speed to the sprite's position. Over again, speed is measured in points per second, so you demand to multiply it by the delta time to brand it piece of work correctly.
- Clamp the new position to the sides of the screen. You don't desire the actor'due south spaceship to go offscreen, never to exist found once again!
Finally, add the post-obit line to init to make update agile:
[self scheduleUpdate]; And so add update itself:
- (void)update:(ccTime)dt { [self updatePlayer:dt]; } That should do it. Build and run the game. You can at present control the spaceship by tilting the device.

Begin the Trigonometry!
If you skipped ahead to this section, here is the starter project at this point. Build and run it on your device – yous'll run into at that place'due south a spaceship that y'all tin can motility around with the accelerometer.
Yous haven't seen whatever trigonometry yet, so let's put some into activity.
Note: If you've used Cocos2D before, y'all might know Cocos2D comes with handy built-in methods like ccpLength, ccpAngle, and more that are wrappers over the raw trigonometry functions for ease of use. In this tutorial, you will non be using these functions – instead you will exist going low level and issuing the raw trigonometry calls yourself, for the learning experience. In an actual game, you might want to use the wrapper methods however.
It would be cool – and much less disruptive to the player! – to rotate the spaceship in the direction information technology is currently moving rather than having it always pointing up.
To rotate the spaceship, you need to know the angle to rotate it. Simply you don't know what that is, and so how tin can you lot figure that out?
Let's think near what you do know. You do have the histrion's speed, which consists of two components: a speed in the x-direction and a speed in the y-direction:

If you rearrange these a fiddling, you can see that they course a triangle:

Here you know the lengths of the adjacent (_playerSpeedX) and the reverse (_playerSpeedY) sides.
So basically, you know 2 sides of a correct triangle, so you lot are in the Know ii Sides, Need Angle case mentioned in the beginning of this tutorial. That means you need to utilize one of the inverse functions: arcsin, arccos or arctan.
You lot know the opposite and side by side sides, so you want to use the arctan function to find the angle to rotate the ship. Remember, that looks like the post-obit:
angle = arctan(contrary / adjacent)
The Objective-C math library comes with the atan() part that computes the arc tangent, but it has one large issue: what if the 10-speed is 0? In that instance, the next is 0 and dividing by 0 is mathematically undefined. Your app might crash or simply behave weirdly when that happens.
Instead of using atan(), it is improve to use the function atan2(), which takes two parameters and correctly handles the division-by-zero scenario without you having to worry virtually it:
bending = atan2(contrary, adjacent)
Important: The angle that atan2f() gives you lot is not the inner angle inside the triangle, but the bending that the hypotenuse makes with that 0-degree line:

This is some other reason why atan2() is a lot more useful than apparently, erstwhile atan().
So let'southward requite that a shot. Add the following two lines to the bottom of updatePlayer:
float angle = atan2f(_playerSpeedY, _playerSpeedX); _playerSprite.rotation = angle; Notation that the arctan function you lot are using is actually chosen atan2f() instead of just atan2(). More than well-nigh that in a moment. Besides observe that the y-coordinate goes outset. A common mistake is to write atan2f(x, y) but that's the wrong way around. Remember the first parameter is the opposite, and in this case the Y coordinate is the contrary.
Build and run the app to endeavor it out:

Hmm, this doesn't seem to be working quite right. What is wrong here?
Radians vs. Degrees
Normal human beings tend to recollect of angles as values between 0 and 360. Mathematicians, however, measure angles in radians, which are expressed in terms of π (the Greek letter of the alphabet Pi, which sounds similar pie but doesn't taste as proficient).
Information technology's not essential to sympathize, just if you're curious, 1 radian is the angle you lot get when you travel the distance of the radius along the arc of the circle. You can practise that 2π times (roughly half dozen.28 times) before yous end upward at the first of the circle again.

So while you may retrieve of angles as values from 0 to 360, a mathematician sees values from 0 to 2π. And that's where your trouble lies. atan2f() returns a value in radians merely Cocos2D's sprite rotation property expects degrees. That's why you only saw the sprite rotate a piffling: angles measured in radians are much smaller than angles measured in degrees.
Fortunately, it is easy to convert from one to the other. Change the line that sets _playerSprite.rotation to:
_playerSprite.rotation = CC_RADIANS_TO_DEGREES(bending); The CC_RADIANS_TO_DEGREES macro is Cocos2D'due south way of doing the conversion but you tin can easily write your own function or macro to do this. I don't have these formulas memorized but they are easy enough to derive yourself when you realize than an angle of 360 degrees corresponds to 2π:
Angle in degrees / 360 degrees = Bending in radians / 2π radians
To go from radians to degrees, the formula becomes:
Bending in degrees = (Bending in radians / 2π) * 360
And the other fashion around, from degrees to radians:
Bending in radians = (Angle in degrees / 360) * 2π
I betoken this out because forgetting to convert betwixt radians and degrees is probably the almost common mistake programmers make when they are dealing with trigonometry! And then if you don't see the rotation you expected, brand sure you're not mixing up your degrees and radians…
So what the @#! is π? Pi is the ratio of the circumference of a circle to its diameter. In other words, if you lot measure the outside of any circle and split information technology by its diameter (which is twice the radius), you get the number 3.141592… and that is what we call π. It takes 2π radians to go all the way around a circumvolve, which is why 360 degrees corresponds to 2π. Pi is a very of import concept in mathematics that shows upwardly all the fourth dimension, especially with annihilation that is cyclical.
By the fashion, not everyone likes π. Some people believe that information technology would accept been better to choose the ratio of the circumference to the radius, instead of to the diameter. This number is chosen tau (τ) and is equal to 2π, thus simplifying many of the calculations. Yous can read more nigh tau at tauday.com.
Anyway, back to the game. Build and run to meet some glorious rotation in action.

Whoops, something is even so not right. The spaceship certainly rotates but information technology seems to be pointing in the direction opposite to where information technology'south flying!
Here's what'southward happening: the sprite for the spaceship points straight upwards, which corresponds to the default rotation value of 0 degrees. Just in mathematics, an bending of 0 degrees (or radians) doesn't point upward, merely to the right:

And that'southward non the but problem: in Cocos2D, rotation happens in a clockwise direction, just in mathematics it goes counterclockwise.
To overcome these differences, change the line to:
_playerSprite.rotation = 90.0f - CC_RADIANS_TO_DEGREES(angle); This adds 90 degrees to make the sprite point to the right at an angle of 0 degrees, then that it lines upwardly with the mode atan2f() does things. Then it adds the negative bending – in other words, subtracts the angle – in order to rotate the proper style around.
Build and run over again to try information technology out. You'll finally have a spaceship that has its head on straight!

Bouncing Off the Walls
You accept a spaceship that you can motion using the accelerometers and yous're using trig to make sure it points in the direction it's flight. That's a expert start.
Unfortunately, having the spaceship get stuck on the edges of the screen isn't very satisfying. You lot're going to fix that by making it bounce off the screen borders instead.
Beginning, annotate these lines from updatePlayer:
//newX = MIN(_winSize.width, MAX(newX, 0)); //newY = MIN(_winSize.height, MAX(newY, 0)); Then add together the following code to updatePlayer, merely after the commented lines:
BOOL collidedWithVerticalBorder = NO; BOOL collidedWithHorizontalBorder = NO; if (newX < 0.0f) { newX = 0.0f; collidedWithVerticalBorder = Yep; } else if (newX > _winSize.width) { newX = _winSize.width; collidedWithVerticalBorder = YES; } if (newY < 0.0f) { newY = 0.0f; collidedWithHorizontalBorder = YES; } else if (newY > _winSize.peak) { newY = _winSize.height; collidedWithHorizontalBorder = YES; } This checks whether the spaceship striking whatsoever of the screen borders and if then, sets a BOOL variable to YES. But what to practice after such a collision takes place? To make the spaceship bounce off the border, yous can simply reverse its speed and acceleration.
First, define a abiding at the top of the file, in a higher place the @implementation line:
const float BorderCollisionDamping = 0.4f; Add the following lines in updatePlayer, directly below the code yous last added there:
if (collidedWithVerticalBorder) { _playerAccelX = -_playerAccelX * BorderCollisionDamping; _playerSpeedX = -_playerSpeedX * BorderCollisionDamping; _playerAccelY = _playerAccelY * BorderCollisionDamping; _playerSpeedY = _playerSpeedY * BorderCollisionDamping; } if (collidedWithHorizontalBorder) { _playerAccelX = _playerAccelX * BorderCollisionDamping; _playerSpeedX = _playerSpeedX * BorderCollisionDamping; _playerAccelY = -_playerAccelY * BorderCollisionDamping; _playerSpeedY = -_playerSpeedY * BorderCollisionDamping; } If a collision registered, you flip the dispatch and speed values around. Detect that this as well multiplies the acceleration and speed by a damping value, BorderCollisionDamping.
Every bit usually happens in a collision, some of the motion energy is dissipated by the bear on. In this case, you brand the spaceship retain only 40% of its speed after bumping into the screen edges.
Try it out. Smash the spaceship into the border and see what happens. Who said spaceships can't bounce?

For fun, play with the value of BorderCollisionDamping to see the result of different values for this constant. If you make it larger than i.0f, the spaceship actually gains energy from the standoff.
Note: Now why is at that place an f behind those numbers in the code: 0.4f, 0.1f, 0.0f, so on? And why did you lot use atan2f() instead of just atan2()? When you lot write games, you lot want to work with floating point numbers equally much equally possible because, unlike integers, they allow for digits behind the decimal point. This allows yous to be much more than precise.
In that location are two types of floating point numbers: floats and doubles (there is too a "long double", but that'south the same equally a double on the iPhone). Doubles are more than precise than floats just they also have up more retentivity and are slower in practice. When you lot don't put the f behind the number and but use 0.4, 0.i, 0.0, or when you apply the version of a math part without the f suffix, you are working with doubles and not floats.
Information technology doesn't actually thing if y'all use a double here and in that location. For instance, the time value that CACurrentMediaTime() returns is a double. However, if you're doing hundreds of thousands of calculations every frame, you volition observe the difference. I did a quick test on a couple of my devices and the same calculations using doubles were ane.5 to 2 times slower. So information technology's a skilful addiction to stick to regular floats where you can.
Yous may take noticed a slight problem. Keep the spaceship aimed at the bottom of the screen so that information technology continues smashing into the border over and over, and you'll run across a abiding flicker betwixt the upwards and down angles.
Using the arc tangent to discover the angle between a pair of 10- and y-components works quite well, simply only if those ten and y values are fairly big. In this case, the damping factor has reduced the speed to nearly null. When you apply atan2f() to very small values, even a tiny change in these values can outcome in a large change in the resulting angle.
One way to ready this is to not modify the bending when the speed is very slow. That sounds similar an first-class reason to give a call to our old friend, Pythagoras.

Right now yous don't have such a thing as "the ship'southward speed". Instead, yous have ii speeds: one in the x-management and one in the y-direction. Just in order to draw any conclusions about "the ship's speed" – is it too tiresome to actually rotate the ship? – you need to combine these ten and y speed values into one unmarried value:

Here you are in the Know ii Sides, Demand Remaining Side example discussed before.
Equally you tin see, the true speed of the spaceship, that is, how many points it moves across the screen in a second, is the hypotenuse of the triangle that is formed by the speed in the x-direction and the speed in the y-management. Put in terms of the Pythagorean formula:
true speedtwo =
_playerSpeedX2 +_playerSpeedY2
To find the actual value, yous demand to take the square root:
true speed = √(
_playerSpeedX2 +_playerSpeedY2)
Add this code to updatePlayer. First remove this block of lawmaking:
float bending = atan2f(_playerSpeedY, _playerSpeedX); _playerSprite.rotation = 90.0f - CC_RADIANS_TO_DEGREES(angle); And replace it with this cake of code:
float speed = sqrtf(_playerSpeedX*_playerSpeedX + _playerSpeedY*_playerSpeedY); if (speed > forty.0f) { float bending = atan2f(_playerSpeedY, _playerSpeedX); _playerSprite.rotation = 90.0f - CC_RADIANS_TO_DEGREES(angle); } Build and run. You'll encounter the spaceship now acts a lot more than stable at the edges of the screen. If you're wondering where the value forty.0f came from, the answer is: experimentation. I put some NSLog() statements into the code to wait at the speeds at which the craft typically hit the borders, and and so I tweaked this value until it felt right.
Blending Angles for Smooth Rotation
Of course, fixing one thing always breaks something else. Try slowing down the spaceship until it has stopped, so flip the device so the spaceship has to turn around and fly the other way.
Previously, that happened with a squeamish animation where yous actually saw the ship turning. But because you just added some code that prevents the ship from changing its angle at depression speeds, the turn is at present very abrupt. Information technology's only a minor detail, but it is the details that make great products.
The set is to not switch to the new angle immediately, but to gradually "blend" it with the previous angle over a series of successive frames. This re-introduces the turning animation and yet prevents the transport from rotating when information technology is not moving fast enough.
Blending sounds fancy, simply it'due south actually quite easy to implement. It does require you to keep track of the spaceship'due south angle between updates, so add a new instance variable for information technology in the implementation block in HelloWorldLayer.one thousand:
@implementation HelloWorldLayer { ... float _playerAngle; } Change the rotation code in updatePlayer from this:
bladder speed = sqrtf(_playerSpeedX*_playerSpeedX + _playerSpeedY*_playerSpeedY); if (speed > 40.0f) { float angle = atan2f(_playerSpeedY, _playerSpeedX); _playerSprite.rotation = 90.0f - CC_RADIANS_TO_DEGREES(angle); } To this:
float speed = sqrtf(_playerSpeedX*_playerSpeedX + _playerSpeedY*_playerSpeedY); if (speed > 40.0f) { float angle = atan2f(_playerSpeedY, _playerSpeedX); const float RotationBlendFactor = 0.2f; _playerAngle = angle * RotationBlendFactor + _playerAngle * (i.0f - RotationBlendFactor); } _playerSprite.rotation = ninety.0f - CC_RADIANS_TO_DEGREES(_playerAngle); The _playerAngle variable combines the new angle and its own previous value by multiplying them with a blend factor. In homo-speak, this ways the new angle only counts for 20% towards the actual rotation that you assail the spaceship. Of course, over time more and more of the new angle gets added so that eventually the spaceship does betoken in the proper direction.
Note that the line that sets the _playerSprite's rotation property is now exterior the if statement.
Build and run to verify that at that place is no longer an precipitous modify from one rotation angle to some other.

Now try flight in a circle a couple of times, both clockwise and counterclockwise. You'll notice that at some signal in the turn the spaceship suddenly spins in the contrary direction. It always happens at the same point in the circle. What's going on?
Well, there is something you lot should know almost atan2f(). It does not return an angle in the user-friendly range of 0 to 360 degrees, but a value betwixt +π and –π radians, or between +180 and -180 degrees to united states non-mathematicians:

That ways if you're turning counterclockwise, at some indicate the angle will jump from +180 degrees to -180 degrees; or the other way around if you're turning clockwise. And that'due south where the weird spinning issue happens.
The trouble is that when the new angle jumps from 180 degrees to -180 degrees, _playerAngle is still positive considering it is trailing behind a bit. When you blend these 2 together, the spaceship actually starts turning the other way around. Information technology took me a while to figure out what was causing this!
To fix it, you need to recognize when the angle makes that jump and adjust _playerAngle accordingly. Add a new instance variable at the bottom of the HelloWorldLayer implementation block:
@implementation HelloWorldLayer { ... float _lastAngle; } And modify the rotation code one more than time from this:
float speed = sqrtf(_playerSpeedX*_playerSpeedX + _playerSpeedY*_playerSpeedY); if (speed > 40.0f) { float angle = atan2f(_playerSpeedY, _playerSpeedX); const float RotationBlendFactor = 0.2f; _playerAngle = angle * RotationBlendFactor + _playerAngle * (1.0f - RotationBlendFactor); } _playerSprite.rotation = ninety.0f - CC_RADIANS_TO_DEGREES(_playerAngle); To this:
float speed = sqrtf(_playerSpeedX*_playerSpeedX + _playerSpeedY*_playerSpeedY); if (speed > 40.0f) { bladder bending = atan2f(_playerSpeedY, _playerSpeedX); // Did the bending flip from +Pi to -Pi, or -Pi to +Pi? if (_lastAngle < -3.0f && bending > iii.0f) { _playerAngle += M_PI * ii.0f; } else if (_lastAngle > 3.0f && bending < -3.0f) { _playerAngle -= M_PI * 2.0f; } _lastAngle = angle; const bladder RotationBlendFactor = 0.2f; _playerAngle = angle * RotationBlendFactor + _playerAngle * (1.0f - RotationBlendFactor); } _playerSprite.rotation = 90.0f - CC_RADIANS_TO_DEGREES(_playerAngle); Build and run. That'll fix things right up and you lot should accept no more problems turning your spacecraft!
This may take seemed similar an cabalistic little problem not worth so much fourth dimension, just it'southward skilful to be aware that atan2f() gives you angles from -180 degrees (or –π radians) to +180 degrees (or π radians). If you're using arc tangent to calculate an bending and you get weird behavior similar the spinning yous saw hither, then y'all might demand to verify that your angles really are what you await them to exist.
Using Trig to Detect Your Target
This is a bang-up commencement - you have a spaceship moving forth pretty smoothly! But then far the spaceship's life is too easy and carefree. Let'south spice this up by adding an enemy: a large cannon!
Add two new instance variables in the implementation block in HelloWorldLayer.m:
@implementation HelloWorldLayer { ... CCSprite *_cannonSprite; CCSprite *_turretSprite; } You'll set these sprites upwards in init. Place this lawmaking earlier the cosmos of _playerSprite and then that the spaceship ever gets fatigued "above" the cannon:
_cannonSprite = [CCSprite spriteWithFile:@"Cannon.png"]; _cannonSprite.position = ccp(_winSize.width/2.0f, _winSize.top/2.0f); [self addChild:_cannonSprite]; _turretSprite = [CCSprite spriteWithFile:@"Turret.png"]; _turretSprite.position = ccp(_winSize.width/2.0f, _winSize.pinnacle/2.0f); [self addChild:_turretSprite]; The cannon consists of two sprites: the fixed base and the turret that tin can rotate to have aim at the histrion. Build and run, and you should take a brand-new cannon sitting smack in the heart of the screen.

Now yous'll give the cannon a target to snipe at - I bet you know who!
Yep, its turret should point at the player at all times. To go this to work, yous demand to effigy out the bending to rotate the turret then that information technology points toward the histrion.
Figuring this out will be very like to how you figured out how to rotate the spaceship in guild to point toward the direction it's moving in. The departure is that this time, the triangle won't be based on the speed of the spaceship. Instead information technology will be drawn between the center positions of the 2 sprites:

Again, yous can use atan2f() to summate this bending. Add the following method:
- (void)updateTurret:(ccTime)dt { float deltaX = _playerSprite.position.x - _turretSprite.position.x; float deltaY = _playerSprite.position.y - _turretSprite.position.y; float angle = atan2f(deltaY, deltaX); _turretSprite.rotation = 90.0f - CC_RADIANS_TO_DEGREES(angle); } The deltaX and deltaY variables measure the distance between the player sprite and the turret sprite. You plug these values into atan2f() to become angle of rotation.
As earlier, you lot need to convert this angle to degrees and adjust for the differences betwixt mathematics and Cocos2D. Remember that atan2() always gives you lot the angle betwixt the hypotenuse and the 0-degree line. It is non the angle inside the triangle.
Don't forget to call this new updateTurret: method from update, or naught much will happen:
- (void)update:(ccTime)dt { [cocky updatePlayer:dt]; [self updateTurret:dt]; } Build and run. The cannon is now always pointing at the spaceship. Encounter how easy that was? That's the power of trig for you!

Claiming: It is unlikely that a real cannon would be able to deed and so instantaneously – it would accept to be able to predict exactly where the target was going. Instead, a real cannon would always be playing grab up.
You can accomplish this past "blending" the erstwhile angle with the new one, only like you did earlier. The smaller the alloy gene, the more time the turret needs to catch up with the spaceship. See if you can implement this on your own.
Adding Wellness Bars... That Movement!
Soon the player will be able to fire missiles at the cannon, and the cannon will exist able to inflict impairment on the role player. To show the amount of striking points each object has remaining, you volition add health bars to the scene using CCDrawNode, a new feature of Cocos2D v2.i.
First, you have to practise some prep. Add a couple of new constants to the top of the file:
const int MaxHP = 100; const float HealthBarWidth = xl.0f; const float HealthBarHeight = iv.0f; Also add a couple of new example variables in the implementation block:
@implementation HelloWorldLayer { ... int _playerHP; int _cannonHP; CCDrawNode *_playerHealthBar; CCDrawNode *_cannonHealthBar; } Add the following to the bottom of init to prepare these new variables:
_playerHealthBar = [[CCDrawNode alloc] init]; _playerHealthBar.contentSize = CGSizeMake(HealthBarWidth, HealthBarHeight); [self addChild:_playerHealthBar]; _cannonHealthBar = [[CCDrawNode alloc] init]; _cannonHealthBar.contentSize = CGSizeMake(HealthBarWidth, HealthBarHeight); [self addChild:_cannonHealthBar]; _cannonHealthBar.position = ccp( _cannonSprite.position.x - HealthBarWidth/ii.0f + 0.5f, _cannonSprite.position.y - _cannonSprite.contentSize.height/ii.0f - 10.0f + 0.5f); _playerHP = MaxHP; _cannonHP = MaxHP; The _playerHealthBar and _cannonHealthBar objects are instances of CCDrawNode, which is like a sprite except that you can draw capricious shapes into it. That is ideal for your wellness bars, which consist of a border and a filled rectangle.
Annotation that you placed the _cannonHealthBar sprite slightly below the cannon, but didn't assign a position to the _playerHealthBar notwithstanding. That's considering the cannon never moves, so you can simply prepare the position of its wellness bar once and forget about it.
Yet, whenever the spaceship moves, yous have to adjust the position of the _playerHealthBar as well. That happens in updatePlayer. Add together the following lines to the lesser of that method:
_playerHealthBar.position = ccp( _playerSprite.position.ten - HealthBarWidth/2.0f + 0.5f, _playerSprite.position.y - _playerSprite.contentSize.pinnacle/2.0f - 15.0f + 0.5f); At present all that's left is drawing the confined themselves. Add this new method to the bottom of the file:
- (void)drawHealthBar:(CCDrawNode *)node hp:(int)hp { [node clear]; CGPoint verts[iv]; verts[0] = ccp(0.0f, 0.0f); verts[1] = ccp(0.0f, HealthBarHeight - 1.0f); verts[2] = ccp(HealthBarWidth - i.0f, HealthBarHeight - 1.0f); verts[iii] = ccp(HealthBarWidth - one.0f, 0.0f); ccColor4F clearColor = ccc4f(0.0f, 0.0f, 0.0f, 0.0f); ccColor4F fillColor = ccc4f(113.0f/255.0f, 202.0f/255.0f, 53.0f/255.0f, 1.0f); ccColor4F borderColor = ccc4f(35.0f/255.0f, 28.0f/255.0f, 40.0f/255.0f, i.0f); [node drawPolyWithVerts:verts count:4 fillColor:clearColor borderWidth:ane.0f borderColor:borderColor]; verts[0].x += 0.5f; verts[0].y += 0.5f; verts[1].10 += 0.5f; verts[1].y -= 0.5f; verts[2].x = (HealthBarWidth - ii.0f)*hp/MaxHP + 0.5f; verts[two].y -= 0.5f; verts[3].10 = verts[2].x; verts[3].y += 0.5f; [node drawPolyWithVerts:verts count:iv fillColor:fillColor borderWidth:0.0f borderColor:clearColor]; } This sets upward an array of points for the corners of the rectangle that you'll exist drawing, then draws it twice: once for the edge, which always has the same size, and in one case for the amount of health, which changes depending on the number of remaining hitting points.
Of grade, you need to call this method, once for the actor and once for the cannon. Add these two lines to update:
[self drawHealthBar:_playerHealthBar hp:_playerHP]; [self drawHealthBar:_cannonHealthBar hp:_cannonHP]; Build and run. Now both the role player and the enemy have health bars:

Using Trig for Standoff Detection
Correct now, the spaceship can fly directly over the cannon without consequence. It would be more than fun if it didn't accept it so piece of cake and instead suffered damage for colliding with the cannon. This is where this tutorial enters the sphere of collision detection (don't miss that pun).
At this indicate, a lot of game devs retrieve, "I need a physics engine!" and reach for Box2D. While information technology's certainly true that you lot tin can use Box2D for this, it'due south not that difficult to do standoff detection yourself, especially when you can use circles.
Detecting whether 2 circles intersect is a piece of cake: all you accept to do is look at the altitude between them (*cough* Pythagoras) and run into if it is smaller than the radius of both circles.

Add two new constants to the height of HelloWorldLayer.m:
const float CannonCollisionRadius = twenty.0f; const bladder PlayerCollisionRadius = 10.0f; These are the sizes of the collision circles around the cannon and the role player. Looking at the sprite, you'll run into that the radius of the cannon is slightly larger at 25 points, merely it's prissy to have a bit of wiggle room. Y'all don't want your games to be too unforgiving or players will think it is unfair.
The fact that the spaceship isn't circular at all shouldn't deter you. Often a circle is a skilful enough approximation of the shape of your sprite, and it has the large advantage that it makes information technology like shooting fish in a barrel to do the necessary calculations. In this case, the body of the ship is roughly 20 points in diameter (call back, the diameter is twice the radius).
Add together a new method that does the collision detection:
- (void)checkCollisionOfPlayerWithCannon { float deltaX = _playerSprite.position.x - _turretSprite.position.x; float deltaY = _playerSprite.position.y - _turretSprite.position.y; float distance = sqrtf(deltaX*deltaX + deltaY*deltaY); if (distance <= CannonCollisionRadius + PlayerCollisionRadius) { [[SimpleAudioEngine sharedEngine] playEffect:@"Collision.wav"]; } } You've seen how this works before: first y'all calculate the altitude between the 10-positions of the ii sprites, and so the y-distance. With these ii values, yous can calculate the hypotenuse, which is the true distance betwixt these sprites. If that altitude is smaller than the collision circles, a sound issue is played.
In update, add a call to this new method, in a higher place the calls to drawHealthBar:
[self checkCollisionOfPlayerWithCannon]; Likewise add this line to init to pre-load the sound upshot:
[[SimpleAudioEngine sharedEngine] preloadEffect:@"Collision.wav"]; Give it a whirl and drive the spaceship into the cannon.

Notice that the audio effect is a little odd. It'due south because while the spaceship flies over the cannon, the game registers repeated collisions, one after another. There isn't only 1 collision, there are many, and information technology plays the sound effect for every one of them.
Collision detection is only the showtime step. The second step is standoff response. Not but exercise you want to play a audio effect, just you also desire the spaceship to bounciness off the cannon.
Add these lines inside the if statement in checkCollisionOfPlayerWithCannon:
const float CannonCollisionDamping = 0.8f; _playerAccelX = -_playerAccelX * CannonCollisionDamping; _playerSpeedX = -_playerSpeedX * CannonCollisionDamping; _playerAccelY = -_playerAccelY * CannonCollisionDamping; _playerSpeedY = -_playerSpeedY * CannonCollisionDamping; This is like to what you did for making the spaceship bounce off the screen borders. Build and run to see how it works.

Information technology works pretty well when the spaceship is going fast when information technology hits the cannon. But if it's moving too slow, then fifty-fifty after reversing the speed, the send stays within the collision radius and never makes its style out of information technology. And then this solution has some problems.
Instead of billowy the ship off the cannon by reversing its existing speed, y'all will but expel the ship with a fixed speed and so that information technology always moves outside of the standoff area, no thing how fast or slow it was flying when it hit the cannon.
This requires you to add together a new constant at the height of HelloWorldLayer.grand:
const float CannonCollisionSpeed = 200.0f; Remove those lines you just added in checkCollisionOfPlayerWithCannon and supersede them with the following:
bladder angle = atan2f(deltaY, deltaX); _playerSpeedX = cosf(bending) * CannonCollisionSpeed; _playerSpeedY = sinf(angle) * CannonCollisionSpeed; _playerAccelX = 0.0f; _playerAccelY = 0.0f; _playerHP = MAX(0, _playerHP - 20); _cannonHP = MAX(0, _cannonHP - v); That is the speed you desire the spaceship to have after it collides with the cannon. Yous need to calculate how much of that speed goes in the ten-direction and how much in the y-management, based on the angle of impact:

You can calculate the angle using arctan because y'all know the electric current speed of the role player. To calculate how fast the player bounces off the cannon in the x- and y-directions, you already accept 2 pieces of data: the angle that y'all merely calculated, and the new speed, CannonCollisionSpeed, which is the hypotenuse of the triangle.
If you look dorsum at the theory section, you will see that yous can calculate the new x-component of the speed using the cosine function and the y-component using the sine office:
- new x-speed = cos(angle) * hypotenuse
- new y-speed = sin(angle) * hypotenuse
And that's exactly what you lot're doing in the code in a higher place. Build and run, and y'all'll run across the spaceship now bounces properly off the cannon and loses some hit points in the process.
Adding Some Spin
For an additional effect, yous tin can add spin to the spaceship after a collision. This is additional rotation that doesn't influence the flight direction. It but makes the effect of the standoff more profound (and the pilot dizzy). Add a new instance variable in the implementation cake:
@implementation HelloWorldLayer { ... float _playerSpin; } In checkCollisionOfPlayerWithCannon, add the following line within the collision detection block:
if (distance <= CannonCollisionRadius + PlayerCollisionRadius) { ... _playerSpin = 180.0f * three.0f; } This sets the corporeality of spin to a circumvolve and a one-half, which I think looks pretty good. Now at the bottom of updatePlayer, add the post-obit code to add spin to the rotation:
_playerSprite.rotation += _playerSpin; if (_playerSpin > 0.0f) { _playerSpin -= 2.0f * 360.0f * dt; if (_playerSpin < 0.0f) { _playerSpin = 0.0f; } } The amount of spin apace decreases over time – I chose a speed of 720 degrees per 2d. In one case the spin has reached 0, it stops.
Build and run and ready that transport spinning!
Where to Get from Here?
Here is the full example project from the tutorial up to this betoken.
Triangles are everywhere! You've seen how you can use this fact to breathe life into your sprites with the diverse trigonometric functions.
Yous have to admit, it wasn't that hard to follow along, was it? Math doesn't have to be boring if you can apply information technology to fun projects, such as making games.
Merely there's more than to come up: in Part 2 of this Trigonometry for Game Programming series, you'll add missiles to the game, larn more than nearly sine and cosine, and see another useful ways to put the power of trig to work in your games.
In the meantime, driblet by the forums to share how it's going for you lot and so far! Or if you really can't await until office 2, why non brush up on some more Cocos2D with some of our other tutorials. Alternatively, if you want to start diving into more game development why non take a look at the games starter kits available on this site.
Credits: The graphics for this game are based on a free sprite set past Kenney Vleugels. The sound effects are based on samples from freesound.org.

This is a post by iOS Tutorial Team fellow member Matthijs Hollemans, an experienced iOS developer and designer. You can find him on Google+ and Twitter.
Source: https://www.raywenderlich.com/2736-trigonometry-for-game-programming-part-1-2
Belum ada Komentar untuk "Draw Circle Game Dev 1 Cos"
Posting Komentar